
Making Baked Alaska has been on my wish-list for a long-long time. Its something that I have been planning - in fact, dreaming of making but actually never had the courage to do so. Every time I would look at the recipe, I would put making it on the hold, thinking it to be too complicated. I think that is the same with any task - however difficult and arduous the task might be, you will never know until you have tried it and once you cross over the bridge you would always look back and think "Was this what I was so afraid of ?"
Fate landed me with the perfect opportunity of trying out this novel dessert this weekend. My brother was visiting and I thought of making something special for him. Though highly apprehensive, I just decided to go for it. I had a perfect audience too, with both my parents and in-laws being invited for the dinner too.(Who by now have gotten quite used to being guinea pigs to my various experiments.)
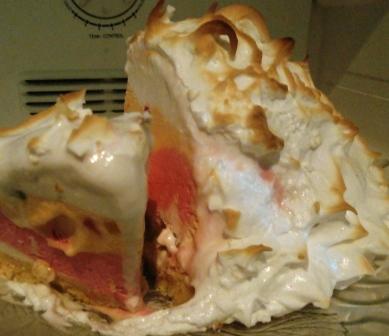
The dessert, as expected turned out really spectacular and fulfilled its promise of wowing my guests. It was a real treat cutting through the meringue and uncovering the lovely juxtaposition of colors beneath.
Basically Baked Alaska in simple terms is a clever combination of cake, ice cream, and meringue. A simple concept - a block of ice cream set on a layer of cake and then all covered with meringue.The meringue acts as an insulation, allowing to brown the meringue without letting the ice cream melt. The secret to a good baked Alaska is keeping everything frozen.
Making Baked Alaska is really simple and takes absolutely no time to assemble. If you are in a hurry, to save time use a shop-bought cake (any flavor that you like - even brownies work very well in this dessert) and any flavors of ice cream. All you have to do is make the meringue at home.You can even do individual portions for your guests to totally bedazzle them. Make it a day ahead so all you have to do is bake them off!
This is one dessert to really "die-for."

For the Base:
1 cake of any flavor (I used the same recipe as the perfect vanilla cupcakes)
Filling:
1 tub vanilla icecream, softened
1 tub strawberry icecream, softened
1 tub tutti-frutti icecream, softened
Meringue:
4 egg whites
250 gms castor sugar
1/2 tsp lemon juice
pinch of salt
Method
Layer the ice cream. Line the bottom of your bowl with clingfilm for easier removal. Fill the base of the bowl with vanilla ice cream, then put in the tutti-frutti and lastly finish with a layer of strawberry ice cream. Cover surface with a clingfilm and freeze for atleast 4 hours to 24 hours.


Place the cake onto a large oven proof plate. ( I sliced the cake horizontally in half). Unmold the ice cream dome on top of the cake. Place back in the freezer.

In a mixing bowl, beat egg whites with lemon juice and a pinch of salt to soft peaks. Gradually add 1/2 cup sugar, beating until stiff and glossy. Freeze 1 hour. According to Rachael Allen, a meringue is ready when you turn your bowl upside-down and the mixture holds on.

Cover the ice cream dome with the meringue, covering it completely, using the back of spoon to make swirly peaks. Freeze for at least 3 hours.

Heat the oven to 250C. Bake for 3 to 5 minutes or until the peaks start to turn a golden brown color. Serve immediately.

For easier slicing, dip the knife in hot water before slicing. Thanks Rachael for all the lovely tips.
Must try once in your lifetime, especially if you have small kids. They would absolutely love it.
 |
| I love the tricolors in the dessert |

No comments:
Post a Comment