Pages

Showing posts with label healthy. Show all posts

Thursday, 11 February 2016

Grilled Red Peppers in the Philips Airfyer

Need I tell you how much I am in love with my Philips Airfryer!! it is my go to, go for, go everything magic machine for just about everything. Out of all my appliances (and I have every imaginable appliance you can think of...some I wonder why I have them in the first place as they see the light of day once in a bluemoon like my Quesadilla tortilla maker, waffle maker, smoothie maker, empanada press(seriously what was I even thinking?) and many others which are just lying around useless and unused. I guess when you are fond of cooking, like me,it just feels good to be surrounded by all the possible gadgets, you never know what might come in handy!!
To cut the story short, out of the gazillion things I own, this one is my absolute favorite. Its no-nonsense, a breeze to use, no sweat quality appeals to me the most. Whether it is meat or vegetables it grills almost anything to utmost perfection and this makes me go back to it again and again. And I am sure anyone who owns this will agree with me totally. 
I can also proudly profess that my experiments with the Airfryer has impressed many of my friends enough to go and invest in one. So Philips you owe me one!!
My absolute favorite thing to make in my Airfryer is grilling bell peppers. I love how the Bell peppers add a lot of flavor, sweetness and color to any dish without the pungent pepper flavor and roasting them heightens their sweetness. I always try to have a batch ready in my fridge to use as I like to add them in a lot of varied recipes. 
You can use them in dips, soups, casseroles, pizzas, pastas or slice them and use them directly on breads, tarts, stir fries, in wraps amongst a few other things. They really help to boost the color and flavor of the dish. You can also make a big batch and freeze them or puree them with olive oil though I haven't tried it personally as yet.
Red peppers are also a great source of beta-carotene(Vitamin A) and Vitamin C so nutritionally they are a big thumbs up for you and your family.
The biggest advantage of grilling your veggies in the Airfryer is the time factor, Compare grilling peppers for 20-30 minutes in an oven over 10 minutes in the airfryer and I don't need to tell you what most of you are going to choose!! And then there is just no fear of over charring them. You can literally pop them in the Airfryer, go about your other chores and they are ready to use in just 10 minutes. 

Method:
Preheat the Airfryer to 390 F.
Place the whole peppers in the airfryer basket and spray some oil on them,
Set the timer to 10 minutes. After 10 minutes the peppers have shrunk and the skin becomes wrinkled and charred.
Remove them from the basket and cover with an aluminium foil or plastic bag till completely cool.
Once cooled, peel the skins away with your fingers or a paring knife.You can even leave some blackened char on the pepper as it lends a smoky taste to the dish.
Cut them in half and remove the stem and scrape out the seeds.
Use as desired.

Here are some great ways in which you can use the red pepper in various dishes :
http://www.williams-sonoma.com/recipe/grilled-red-pepper-sweet-onion-and-tomato-salad.html
http://www.dishmaps.com/roasted-red-pepper-hummus/19945
http://www.foodnetwork.com/recipes/food-network-kitchens/roasted-red-pepper-soup-recipe.html
http://www.healthy-delicious.com/roasted-red-pepper-and-egg-tart/
http://www.mccormick.com/Gourmet/Recipes/Main-Dishes/Chicken-with-Rosemary-Red-Bell-Peppers-and-Olives

I used them here to make a quick meal of some leftover roasted pork and grilled peppers fajitas.


Thursday, 7 January 2016

Khow-suey (Curried Chicken and Noodles in Coconut milk)

I wonder how many of you have heard of or tasted Khow Suey? Let me tell you, if you haven’t had a taste of this fabulous dish you are seriously missing out on some great flavors.
Khow suey is a Burmese dish made of chicken curry with coconut milk and noodles and served with a wide array of accompaniments. It is believed that this dish originated in Burma and came to East India with Indians who migrated during the World war II. 
I first had a taste of Khow-suey years back at a friends house and instantly fell in love with it. What I love about this dish is that it is essentially a no fuss, one pot meal, filled with tons of flavor. Warm and hearty, it is just what the doctor would order to warm your insides in this cold weather and guaranteed to blast your winter blues away in a jiffy. 
Served with an array of delicious garnishes like crispy fried noodles, crispy burnt garlic, red pepper flakes, boiled noodles, crushed peanuts, caramelized onions, slices of hard boiled eggs, chives and wedges of lemons on the sides add to the glamour quotient of the dish. The way to have it is to add in a little bit of all the garnishes, top it with the chicken coconut curry and then squeeze a bit of lemon and lap it all up. The whole dish comes together in an explosion of flavors
Though the ingredients are really simple,it does take a little time to get them all ready but the end result is so great it is well worth the effort. The ingredients are easily available in the Asian section of any supermarket. Some of you might find the smell of fish sauce a bit too strong but I feel it is an essential addition to the dish as it is what gives the dish an authentic taste. But if you are strongly averse to the smell and taste avoid it by all means.
It is also a fun dish to make for your family or when you have friends over where everyone can enjoy adding up the ingredients and adjusting the seasonings according to their preference.
Go ahead and try it out and fall in love with this dish just as I did.
Serves 5-6
Prep Time: 20 minutes
Cooking Time: 30 minutes

Ingredients
To boil the Noodles
2 cups Noodles
2-3 cloves crushed garlic
salt
For the Chicken Gravy
11/2  pounds skinless, boneless chicken thighs
2 tbsp. vegetable oil
3 small onions, chopped
1 tsp ginger paste
1 tsp garlic paste
½  tsp turmeric powder
1 tsp paprika
2 tbsp fish sauce
1 tsp salt
 6 cups chicken broth
2 cups unsweetened coconut milk
3 tbsp. fish sauce (such as nam pla or nuoc nam)
3 Tbsp Gram flour, soaked in 1/4 cup water for 10 minutes  (can be found in Indian market but can be omitted if not easily available)
1 cup fresh coriander, chopped
Dried red chilli flakes
Salt to taste
Lemon wedges
For the Garnish
4-5 hard boiled eggs, chopped
¼ cup chopped and fried garlic
2 cups boiled egg noodles
 ¼ cup fried onions
½ cup chopped coriander leaves
1 cup fried noodles
¼ cup crushed peanuts
¼ cup chives, chopped
Red pepper flakes
2 lemons cut into wedges
 Method
Boil the water as required for the noodles with salt and garlic. Add in the noodles and boil till al dente. Drain and rinse in cold water. Keep aside.

Cut the chicken into 11/2 inch cubes.
Heat the oil in a large pan. Fry the onion, ginger and garlic paste over moderate heat for 2 minutes. Add the turmeric and paprika and continue to stir fry.
Add the chicken, fish sauce and salt. Stir fry the mixture for 10 minutes.
Add the chicken broth to the chicken and bring to a boil over moderate heat.
Add the gram flour liquid and cook for 20 minutes, stirring continuously.
The gravy will begin to thicken.
Add the coconut milk and fish sauce and cook for 10 minutes more stirring continuously.
Turn the heat off.

For each serving fill the soup bowls with ingredients in this order:
11/2 cup egg noodles
1 tbsp onion slices
Hard cooked egg slices
1 cup hot chicken curry
2 tbsp crispy noodles
Crispy fried garlic
Crushed peanuts
2 tsp fresh coriander
2 tsp green onions
Chilli flakes to taste
Lemon wedges to squeeze over all.

I would highly recommend using all the garnish ingredients.

Sunday, 13 July 2014

Healthy Spring Rolls - The Airfryer Way!!

There is good news for all of us sweating out there - the Monsoons finally seem to have arrived!! 
I know it must have have brought big smiles and a great sense of relief to all the Delhi people, who have by now had just about enough of the unending sweltering heat the last few days, which obstinately was refusing to simmer down its scorching temperatures. We will think about all the problems that the rains brings along with it later, but for the time being lets revel in the moment and enjoy the cool air and the beautiful change of season.
Come monsoons and your taste buds automatically start craving for hot and spicy fried foods -  a plate of hot pakoras accompanied perfectly with a steaming cup of tea tempts you to throw caution to the winds and makes even the strongest of us forget all resolutions about losing weight. But not with this recipe. You can actually have your cake and eat it too. 
Can you imagine hot, crispy spring rolls without a drop of oil? Don't believe it? It is actually possible with Philips Airfryer which is basically a multi-cooker that lets you cook food without the need for oil. The Airfryer has 'Rapid Air Technology" which uses circulating hot air and a grill element to cook the food evenly without the need of vegetable oil. Now you actually don't have to worry yourself sick about the amount of oil you have consumed when indulging in your guilty pleasures and most importantly without compromising on the taste. It is a win-win situation!!
If you want to know what more you can do in the Philips Airfryer, you can check out my earlier posts - "Healthy oil free Gujiyas" and "Papaya and Jaggery cake".
Atleast I am totally smitten with the Airfryer. I find that it is not just another gadget which will occupy space on your kitchen cabinet and lies forgotten, but it actually delivers what it promises. It is perfect for those of you who are health conscious and and want to keep the use of oil to minimum. You will be surprised how quickly it cooks things with the least amount of effort. Start eating the healthy way with the Airfyer, make it your way of life too and I can assure you that like me, you too will fall in love with it.
So now, you no longer have to say no to your favorite fried food !! Just go ahead and indulge yourself and enjoy  the flavor of these monsoons with your favorite crispy fried snacks without an iota of guilt.
Ingredients:
1 packet of Spring Roll Wrappers - thawed if frozen (Try in a supermarket or even your nearest department store- you will be surprised how easily available they are now)
1/2 cabbage - sliced in thin strips
1 small carrot julienned
1 onion, finely sliced
1 tsp finely chopped ginger
1 spring onions, finely sliced lengthways
200 gms boneless chicken breast, sliced into thin strips
1 tbsp oyster sauce
1 tbsp light soy sauce
2 tbsp cornflour
salt and pepper to taste
Method
Heat 1 tbsp oil in a pan till smoking. Add the cabbage, carrots, onions, spring onions, and ginger. Saute the vegetables quickly on very high heat for 1-2 minutes. Add the salt, pepper, oyster sauce and soy sauce. Be careful not to overcook. The vegetables must still have a crunch. Remove from heat and keep aside to cool down.
In the same add the chicken and stir fry for 3-4 minutes. Season. Stir in with the vegetables till well mixed and keep aside to cool.
Make a thick paste of cornflour with 1 tbsp water.
These are the spring roll sheets I got and that too most surprisingly from my local supermarket. There were over 20 sheets in one packet. You need to thaw them to room temperature before separating the sheets. The great thing about this spring roll wrapper is that what you don't use you can throw them back in the freezer to reuse.
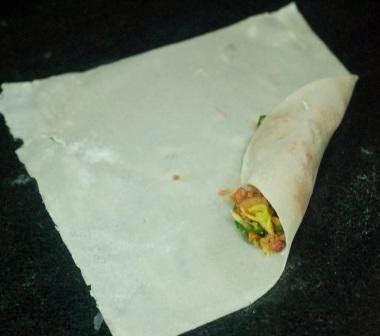
Peel your spring roll wrapper off and lay down one sheet on the surface like a diamond as shown..Cover the unused wrappers under a damp cloth as they dry off very quickly. 
Divide the filling into equal portions. Place some filling on one corner of the wrapper.
Roll tightly and when you are about halfway stop and fold in the opposite corners towards the middle so it looks like an envelope. Brush each corner with the cornflour paste.
Roll the pastry tightly towards the top corner.
Repeat with the remaining spring roll wrappers and fillings.
Place them seam side down (helps secure the corner so that the corners don't open). keep the rolls covered under a damp cloth.
Heat the Airfryer for 10 minutes @ 200. Brush the rolls with oil and place in the Airfryer basket.Cook for 5-8 minutes or till golden and crispy. You will be seriously impressed how crispy these spring rolls turn out to be and that too without oil.
Cut into smaller pieces and serve hot.
Some important Tips (from the net)
  • The best way to defrost a spring roll wrappers : overnight in the refrigerator or keep out on the counter for 30 minutes.
  • once the wrapper are defrosted,, open the package and immediately cover with a barely damp towel. The wrappers will quickly dry out and get cracked if left out in the open uncovered.
  • if the wrappers  dry out and are stiff, you can put a few wrappers on the plate, cover with a damp towel and microwave on medium for 10 minutes. The wrappers will soften up.

Sunday, 16 March 2014

'Holi Bites' - Healthy Oil Free Gujiyas And Namakparas with Philips Airfryer

It won't be wrong to say that Philips Airfryer is full of hot air !! Literary speaking of course.
The Airfryer uses an unique patented combination of high-speed air circulation, with a top grill, called Rapid Air technology. The Rapid Air technology makes the hot air circulate very rapidly around the ingredients in the basket. This heats up the ingredients in the basket from all sides at once, making it a healthy, fast and easy method to prepare tasty food. 
Food prepared in the Airfryer is deliciously crispy on the outside, without being dry on the inside. As the basket is confined within the base pan, the hot air circulates within this space cooking the food with its own fat in the process hence minimising the need for using oil.
Conventional deep fat fryers use oil to heat the food and create the crispy layer. The airfryer does not need frying oil. The food is only heated by the circulating hot air. When you air fry French fries, the fries prepared contain up to 80% less fat compared to fries prepared in a deep-fat fryer. When you prepare homemade French fries, the fat percentage can get as low as 1.5%. It also has air filters so your whole house does not smell of the food that you are frying.
Philips Airfryer is the latest gadget which has taken the market by storm, appealing to the health conscious customers because of its claims of cooking food with upto 80 percent less fat.
Having heard so much of this revolutionary product I had to see it for myself what the hullaboo was all about. Was it just another gimmicky kitchen gadget which will end up taking space and gathering dust on your kitchen counter or would it actually hold up to its promise? So, when someone on behalf of Philips contacted me to review their Airfryer I thought to myself, "Why not ?" After all I have been planning to buy the product ever since I was introduced to it at an event held by Philips 'Foodathon'. Its just that I haven't been able to convince myself till date if it is really worth investing in another voluminous food gadget. 
The Philips Airfryer arrived 2 days back. I think the person who was most excited about it was my son who loves to experiment in the kitchen and needless to say, his exams having gotten over the same day, he was the first one to try his hands on it. He made seekh kebabs with absolutely 0% oil. I was quite delighted with the outcome. The seekh kebabs were nicely browned and cooked to perfection without a hint of being dry - which was contrary to what I was expecting.
With one successful experiment done, I thought why not try out my Gujiyas and Namakparas for this Holi in the Airfryer, instead of frying them in oil?  I was quite impressed with the results as both the Gujiyas and the Namakparas came  out nice and crisp and 'Khasta' like I would have liked them to be. Its amazing just to think how much consumption of oil I will be able to reduce in my everyday usage of the Airfyer. Its absolutely hassle free to use and the best part is that it is even safe for the kids to operate without any fear of untoward accidents happening. It looks like a large rice cooker with a squarish basket which you can remove to place your food inside. And contrary to what I had thought the basket is not all that small. It is a okay size. But the thing is that it cooks so quickly you can easily do two batches in a jiffy. You can put about 800 gms of frozen chips at one go which cooks in 12 minutes. Just ensure that you shake the basket halfway. 
Now that the Philips Airfryer has roused my interest, I will be experimenting a lot more with this unit. So watch my space for some more Airfryer recipes. It is definitely a much more healthier option and in today's world with all the health worries surrounding us, I think it is a wonderful way for enjoying all those snacks which we had kept away from because of being deep fried.
So what say you, ready for a plate of hot Samosas or some scrumptious Gujiyas?


Gujiyas
Ingredients
Maida - 100 gms
Ghee - 15 gms
Khoya - 100 gms, grated
Cashewnuts - 10 gms, chopped
Raisins - 10 gms
Powdered sugar - 80 gms
Green cardamom powder - 5 gms
oil for brushing
Method
Rub the flour and ghee together till they resemble breadcrumbs. Add water and knead into a stiff dough.
For the filling mix grated khoya, cashewnut, raisins, cardamom and sugar in a bowl.
Divide the doughinto equal portions. Roll out thin rounds of dough. Place them on the gujiya mould. Brush the edges of the mould with plain water. Place a spoonful of the filling in the middle of the mould and press together the edges of the mould. Remove the extra dough. Open the mould and remove the gujiya. 
Preheat the Airfryer at 180 degrees for 5 minutes.
Brush the gujiyas with oil. Arrange the gujiyas in the Airfryer and air fry for 12 minutes or till golden brown.
NamakParas - (Basic recipe adapted from Sanjeev kapoor)
Ingredients
Maida - 1 cup
Semolina (suji)- 1/4 cup
Ghee - 1/4 cup
Ajwain- 1/2 tsp 
Salt - to taste
Method 
Mix the maida and the suji. 
Add ghee and rub in with your fingertips till the mixture resembles breadcrumbs. Add salt and crushed carom seeds. Add sufficient cold water to make a stiff dough. 
Cover the dough and let it rest for 30 minutes. 
Sprinkle some refined flour on a surface and roll out the dough into half a centimeter thick disc.Cut the rolled dough into diamond shaped discs.
Preheat the Airfryer at 180 degrees for 5 minutes.
Take out the tray from the Airfryer and place the namakparas on the tray and air fry them for 8 minutes or till golden brown.
First time I just placed enough to cover the bottom of the tray as I wasn't too sure how they would turn out. But for my second attempt I stacked them on top of each other. Just ensure that you shake the basket halfway to get them evenly cooked.

Now go ahead and enjoy your snacks without feeling guilty or compromising on the taste. 

Enjoy and have a wonderful time on Holi.

Friday, 18 October 2013

Spinach and Cottage Cheese with a Potato Galette

Tired of having the same old boring Palak Paneer dish? 
Try out my videshi twist on our desi Palak Paneer which is sure to attract your kids towards its leafy goodness and never again would you face a problem trying to make them eat spinach. Like, I too have never been a great fan of palak paneer and remember as a kid, I always use to find ways and means to avoid it as far as possible. But this is one spinach dish that totally won me over- I think the golden, crispy bronzed layer of potatoes on the top did the trick and the best part, the kids too totally loved the palak paneer in its new avatar. 
 Ingredients
1 kg spinach, washed and chopped finely
1 onion, finely chopped
2 tbsp garlic, finely chopped
200 gms cottage cheese/paneer, mashed finely
2 tsp mayonaisse
2 tbsp hung curd
1 cup Marinara sauce (check the recipe here)
4 medium sized potatoes
2 tbsp olive oil
2 tbsp dried rosemary
1 tsp garlic salt (optional)
salt and pepper to taste.

Method
Wash potatoes and slice them into thin slices. Dry them on a paper towel.
Heat 1 tbsp oil in a non-stick pan. Add the potato slices and season with the garlic salt, pepper and dried rosemary. Saute over high heat for 4-5 minutes, gently stirring until the potato slices are just starting to soften and become translucent. Transfer the potatoes on to a plate and keep aside.
In the same pan, heat the remaining oil. Add the chopped onion and garlic, saute for 20 seconds. Add in  the spinach, season with salt and pepper and saute for 3-4 minutes until the spinach has wilted and its liquid has completely evaporated. Set aside on a plate.
Next add the mayonnaise and hung curd to the cottage cheese and mix it thoroughly. Season.
To assemble
Cover the bottom of a baking dish with the cottage cheese mash.
Spoon the spinach on top of the cottage cheese.
Next, cover the spinach with the marinara sauce.
Finally, spread the potatoes on top to cover completely. Sprinkle the top with some dried rosemary and garlic salt.(I can't tell you, how much I had to resist myself to add some mozzarella cheese at this point, but ditched the idea in view of keeping it more healthy. It actually tasted great without the cheese but you can go ahead and add some cheese if you like.)
Bake the dish in a preheated oven at 200C for 25-30 minutes till the potatoes are crispy and golden brown.
Dig in and enjoy the healthy feel of gorging on a dish full of amazing goodness.


Sunday, 29 September 2013

Potato, Egg and Green Bean Salad

This salad is light and fresh with a perfect combination of tastes. What I love about this recipe is that there is no mayonnaise in the salad, making it totally a guilt free, healthy option for you. The minced garlic yields a subtle taste to the potatoes and the vinegar a nice tangy taste to the whole salad. As I did not have Parmesan at home, I have substituted it by smoked Gouda cheese which also tasted great, lending a lovely smoky flavor to the whole salad. 
It is amazing how with just a few ingredients you can turn up with a great dish that tastes equally good and is so healthy. 
You can have this salad either as a zesty side dish or it is tasty enough to make a complete meal out of it.

Ingredients (Adapted from recipe by Chef Maurizio Raselli, Hyatt Regency)
100 gms diced beans
100 gms diced potatoes
3 tbsp shallots, chopped
2 Tbsp extra virgin olive oil
1 Tbsp white vinegar
1/2 tsp minced garlic
50 gms aged Parmesan cheese (I used Smoked Gouda instead)
4 boiled eggs,cut into half
rocket leaves
parsely
Method
Cook the beans whole in boiling water for about 5 minutes.
Trim the ends of the beans and split them in two following the natural line.
Cook the  diced potatoes in water till soft.
In a bowl, mix the beans and slightly mashed potatoes.
Add the grated Parmesan/ smoked Gouda cheese, extra virgin olive oil, shallots (or use regular onions in its place), mint leaves and chopped parsely.
Plate it nicely with some rocket leaves underneath and fresh grated parmesan on top as garnish.
Serve warm plated along with the boiled eggs.

Sunday, 22 July 2012

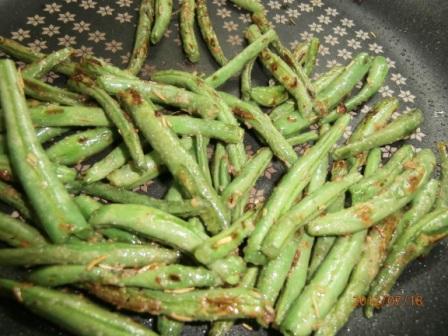
Stir Fried Garlicky Beans

Monday is here and the mad rush has begun. I just dread Mondays - Tiffins to be made for the kids, lunchbox for hubby dear, dusting to be done, clothes to be washed, a long grocery list - the list just seems endless. On such days, wouldn't you just love to have something up your sleeve that's quick and easy. My garlicky stir-fried beans is one such dish that I save for days when I have to keep up with my hectic schedule.

 Ingredients
500 gms french beans 
2 tsp minced garlic
1 tsp dried Thyme
1 tbsp olive oil
1/4 tsp salt
Method
Wash the beans thoroughly and trim both ends. 
Heat the olive oil in a pan.
Put in the minced garlic and cook for 20-30 seconds stirring all the while.
Add the beans and put in the thyme and salt and cook on high for 2 minutes.
Then cover the pan and cook on low heat for further 5 minutes till the beans are slightly done.
Uncover the pan and cook on high for 2 minutes more.
Check for doneness and turn the heat off.
Beans should still be slightly crisp when they're done. 
Serve hot.


Friday, 17 February 2012

Yogurt Chicken without oil


Here is an extremely simple, healthy and low-fat recipe for cooking chicken without oil. In today's health conscious environment what else could one possibly ask for? In this recipe yogurt is used as a marinade for the chicken, which helps in not only tenderizing it but also keeping it moist and succulent. Use the leftover chicken with a tbsp of hung curd, cheese spread and 1/4 tsp crushed garlic to make great chicken sandwiches.
.
Ingredients
1 whole chicken, cut into 8 pieces
4-5 garlic cloves crushed
1 cup plain yogurt
1 tbsp lemon juice
1 tsp salt
1/2 tsp pepper powder
1 tsp dried parsley

Method
Wash the chicken pieces under cold water and  pat the pieces dry with a paper towel.
Mix all the above ingredients together making sure that  the chicken is coated well on all the sides with the marinade.
Cover the bowl with a plastic wrap and leave to marinate in the fridge for 2 -3 hours.
Place a medium sized non-stick skillet on your gas top.
Add the marinated chicken and cook on high heat for about 5 minutes till all the juices of the chicken are released.
Simmer the gas. Cover and cook the chicken  further for 15 - 20 minutes more till the juices have dried up turning the pieces every now and them to make sure they are evenly cooked.
Once the chicken has changed color test it to see that it is tender and thoroughly cooked.
Serve it with bread and a salad.