Pages

Showing posts with label Phiilps Airfryer Recipes. Show all posts

Monday, 11 April 2016

Sichuan Boneless Chicken: Philips Airfryer Recipe

Chinese cuisine is hands-down the favorite in my family whenever we decide to eat out. I have tried to recreate some of our favorite recipes at home and I can say that no one was really disappointed.
The cuisine of Sichuan province in Southwestern China has become quite popular  in recent years. Here is a typical Sichuanese dish with a hard hitting sauce combining hot, sweet sour and salty flavors. The sauce also goes well with Turkey, pork or small meatballs. The best part - it is quick and easy to make.Don't we all just love that!!
Instead of deep frying the chicken in oil, I have used the Philips Airfyer to cook it (trying my best to save on calories in any possible way), but you like, you can go ahead and either stir fry or deep fry the chicken to cook it.
On one of my excursions to Costco, I was thrilled to find this great Nordic Ware 14" Asian wok. For $14.99 I think it was a deal. Even though it is non-stick it gives a nice sear to the noodles. I have also tried some fried rice and vegetables and they both got cooked with great consistency. 
You can serve the Sichuan Chicken with fried rice or Hakka noodles.

This recipe has also been published inThe Urban Spice.com.
Recipe adapted from "A Wok for all seasons" by Celebrity Chef Martin Yan
Serves 4
Prep Time: 20 minutes
Cook Time: 

Marinade
2 Tbsp soy sauce
1/2 tsp cornstarch
4 Tbsp beaten egg
1/2 tsp all purpose flour
salt and pepper to taste  
4 chicken breast halves, skinned, boned and cut into 1/4" strip

Sichuan spicy sauce
1 Tbsp. soy sauce
1 Tbsp shao Hsing wine or dry sherry
4 tsp rice vinegar 
1 tsp sesame oil
1 tsp hot pepper sauce
1/4 tsp sugar

To make the chicken:
3 Tbsp. vegetable oil
1 tsp minced garlic
1/2 tsp minced ginger
1 green onion (including the top leaves) thinly sliced 
6 whole dried red chilli peppers
1 tsp cornstarch mixed with 2 tsp water

Method
Combine marinade ingredients in a small bowl. Add the chicken and stir to coat.
Set aside for 30 minutes. 
Preheat Philips Airfryer to 360 F. Place the chicken in the airfryer basket and cook for 6 minutes. 
Raise the temperature to 390 F and cook for 4 more minutes till the chicken is brown and crispy. Remove chicken and keep aside
Combine the sauce ingredients in a small bowl. Whisk to mix and keep aside.
Add the remaining 1 Tbsp. oil, garlic, ginger, green onion and chilli peppers and cook stirring until fragrant for about 5 seconds.
Stir in the sauce and bring to a boil.

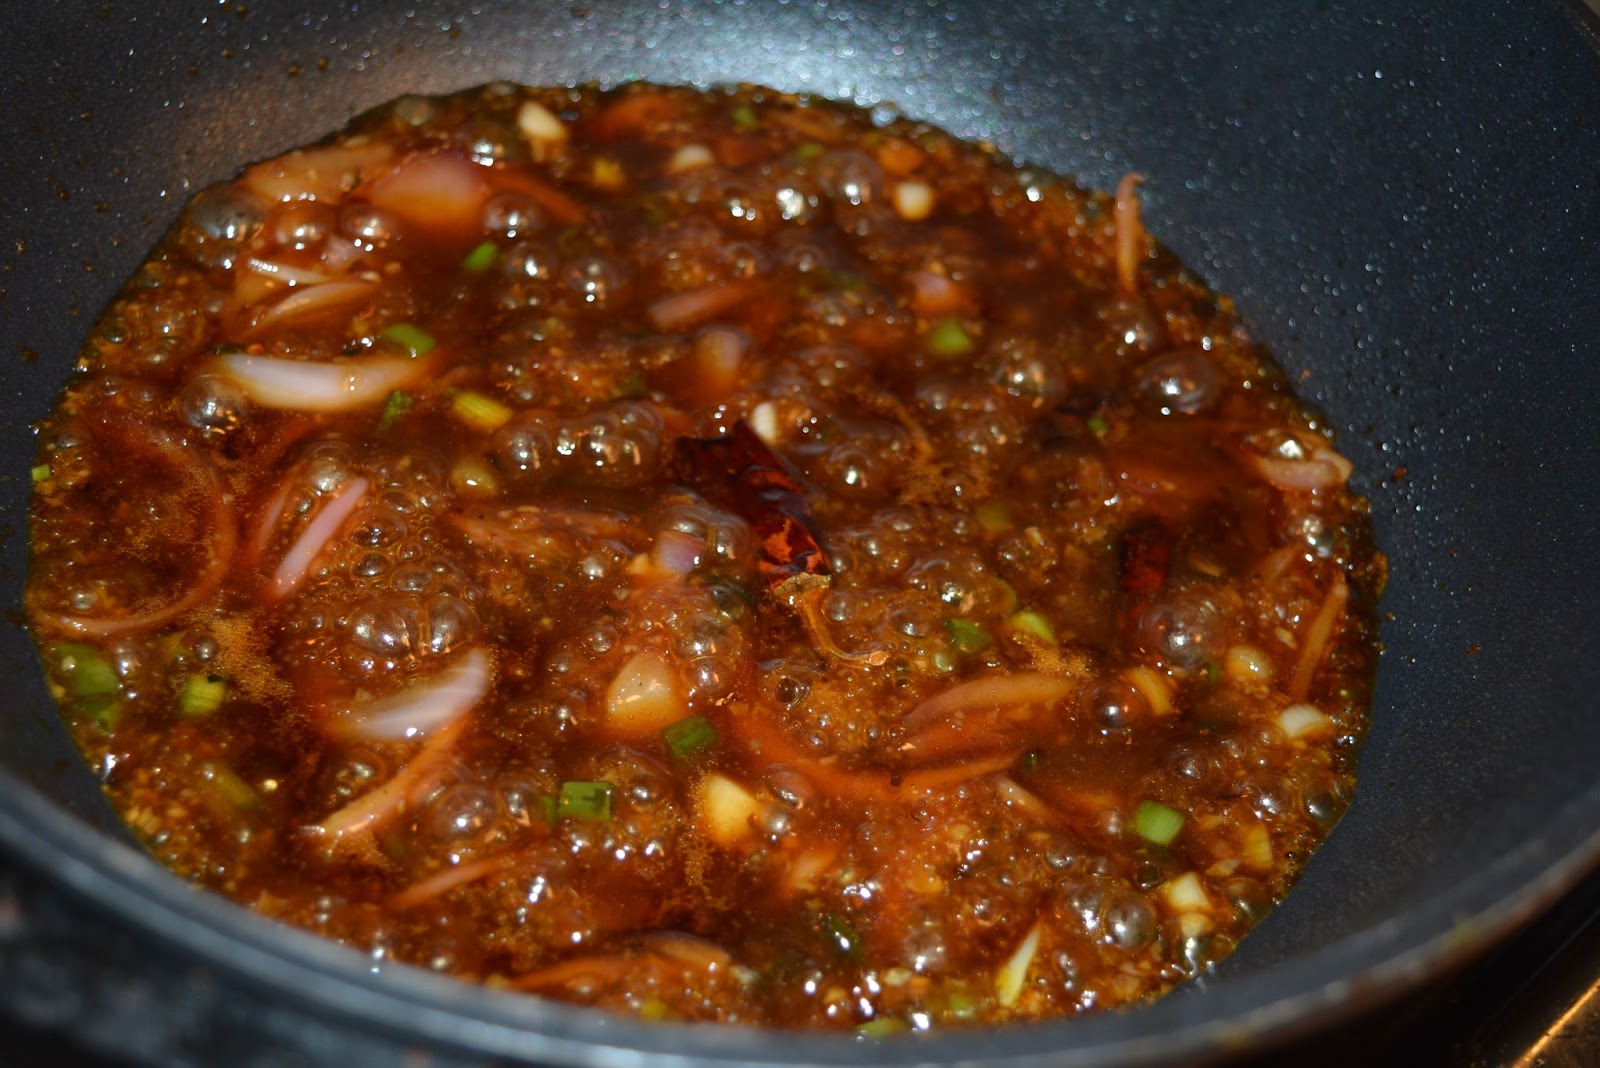
Add in the cornstarch and boil till the sauce starts to thicken slightly. 

Add in the Stir-fried chicken and stir to coat completely in the sauce.

Serve warm with noodles or fried rice. 

Thursday, 11 February 2016

Grilled Red Peppers in the Philips Airfyer

Need I tell you how much I am in love with my Philips Airfryer!! it is my go to, go for, go everything magic machine for just about everything. Out of all my appliances (and I have every imaginable appliance you can think of...some I wonder why I have them in the first place as they see the light of day once in a bluemoon like my Quesadilla tortilla maker, waffle maker, smoothie maker, empanada press(seriously what was I even thinking?) and many others which are just lying around useless and unused. I guess when you are fond of cooking, like me,it just feels good to be surrounded by all the possible gadgets, you never know what might come in handy!!
To cut the story short, out of the gazillion things I own, this one is my absolute favorite. Its no-nonsense, a breeze to use, no sweat quality appeals to me the most. Whether it is meat or vegetables it grills almost anything to utmost perfection and this makes me go back to it again and again. And I am sure anyone who owns this will agree with me totally. 
I can also proudly profess that my experiments with the Airfryer has impressed many of my friends enough to go and invest in one. So Philips you owe me one!!
My absolute favorite thing to make in my Airfryer is grilling bell peppers. I love how the Bell peppers add a lot of flavor, sweetness and color to any dish without the pungent pepper flavor and roasting them heightens their sweetness. I always try to have a batch ready in my fridge to use as I like to add them in a lot of varied recipes. 
You can use them in dips, soups, casseroles, pizzas, pastas or slice them and use them directly on breads, tarts, stir fries, in wraps amongst a few other things. They really help to boost the color and flavor of the dish. You can also make a big batch and freeze them or puree them with olive oil though I haven't tried it personally as yet.
Red peppers are also a great source of beta-carotene(Vitamin A) and Vitamin C so nutritionally they are a big thumbs up for you and your family.
The biggest advantage of grilling your veggies in the Airfryer is the time factor, Compare grilling peppers for 20-30 minutes in an oven over 10 minutes in the airfryer and I don't need to tell you what most of you are going to choose!! And then there is just no fear of over charring them. You can literally pop them in the Airfryer, go about your other chores and they are ready to use in just 10 minutes. 

Method:
Preheat the Airfryer to 390 F.
Place the whole peppers in the airfryer basket and spray some oil on them,
Set the timer to 10 minutes. After 10 minutes the peppers have shrunk and the skin becomes wrinkled and charred.
Remove them from the basket and cover with an aluminium foil or plastic bag till completely cool.
Once cooled, peel the skins away with your fingers or a paring knife.You can even leave some blackened char on the pepper as it lends a smoky taste to the dish.
Cut them in half and remove the stem and scrape out the seeds.
Use as desired.

Here are some great ways in which you can use the red pepper in various dishes :
http://www.williams-sonoma.com/recipe/grilled-red-pepper-sweet-onion-and-tomato-salad.html
http://www.dishmaps.com/roasted-red-pepper-hummus/19945
http://www.foodnetwork.com/recipes/food-network-kitchens/roasted-red-pepper-soup-recipe.html
http://www.healthy-delicious.com/roasted-red-pepper-and-egg-tart/
http://www.mccormick.com/Gourmet/Recipes/Main-Dishes/Chicken-with-Rosemary-Red-Bell-Peppers-and-Olives

I used them here to make a quick meal of some leftover roasted pork and grilled peppers fajitas.


Wednesday, 10 February 2016

Citrus Sage Chicken in the Philips Airfryer

Be ready to be bowled over by the fresh citrus flavors in this wonderful recipe!!
You will get an extremely moist tender chicken from the citrus marinade and has an earthy flavor from the sage. This is an extremely easy recipe and the best part is that it can be made on a grill, or seared in a skillet or cast iron pan which I love cooking on, or toss it in together with some cut citrus fruits to bake it off in an oven. This time around I have grilled it in my favorite kitchen appliance - that is the Philips Airfryer. It grills all kinds of meats perfectly giving a lovely charred taste from the outside and keeping it tender and moist from the inside, locking in all the flavors. I even love to grill my vegetables in the Airfryer which are done to perfection in just no time. It took me some time and after a few trial and error I think I can now confidently say that I have mastered the timing on my Airfryer to grill my meat and veggies to the perfect temperature that I would like them to be. 
If there are any leftovers, shred the chicken and use it in a wrap along with caramelized onions and grilled peppers.Its delicious. I always make an extra batch of the chicken and freeze it to use it for later to make wraps or grilled sandwiches.
You can use any cut of chicken you prefer- chicken thighs, breasts or drumsticks or all of them. I had boneless chicken lying in my freezer so that is what I have used for this recipe
The marinade is really simple to put together and is really quick and easy to make. Also you can double the citrus sage mixture and reserve half of it. Serve the reserved mixture as a sauce to spoon over the grilled chicken. If you have extra citrus peels and sage and are using a charcoal grill, toss them into the charcoal to flavor the smoke. I tossed a few inside the Airfryer and did have an distinct added citrusy flavor to the chicken.
Try it tonight and I can assure you it will soon become your favorite go-to recipe for a quick fix meal. 

Recipe adapted from the book "Good Housekeeping's Grill it!"
Prep: 25 minutes plus marinating         cooking time: 10-12 minutes 
Makes 8 servings 

2 large oranges 
2 large lemons 
1/4 cup fresh sage 
2 tbsp olive oil 
2 tsp salt 
1 tsp coarsely ground black pepper
7-8 pieces of boneless chickens breasts (you can also use a whole chicken cut into eighths)

Grate 1 tbsp peel and squeeze 4 tbsp juice from oranges. 
Do the same with the lemons In a large bowl with a wire whisk or fork combine orange and lemon juice, zest, sage, oil, salt and pepper. 
Add chicken turning to coat. 
Cover and refrigerate for 2 hrs, turning chicken pieces 3-4 times.
Preheat the Airfryer to 360F.
Place the chicken pieces into the basket of the Airfryer. 
Thinly slice an orange and place a few pieces on top of the chicken.
Heat the chicken at 360F for 8 minutes. 
Open the Airfryer basket and turn the chicken pieces over.
Bump up the temperature of the Airfryer to 390F and cook further for 4-5 minutes till no longer pink from inside.  You can also insert a meat thermometer to see that the internal temperature has reached 145 F.
Rest the chicken for 4-5 minutes before serving. 
Alternately you can also grill the chicken in an oven or a outdoor grill. 
Place the chicken on a hot grill for 20 minutes. Turn chicken over and grill for 10-12 minutes more till juices run clear when chicken is pierced with tip of knife.
Try this citrus, sage and olive oil blend as a simple seasoning for veal chops or pork as well as for chicken.

Friday, 1 January 2016

Restaurant Style Butter Chicken and a New year Message for all of you

“I hope that in this year to come, you make mistakes.
Because if you are making mistakes, then you are making new things, trying new things, learning, living, pushing yourself, changing yourself, changing your world. You're doing things you've never done before, and more importantly, you're Doing Something.

So that's my wish for you, and all of us, and my wish for myself. Make New Mistakes. Make glorious, amazing mistakes. Make mistakes nobody's ever made before. Don't freeze, don't stop, don't worry that it isn't good enough, or it isn't perfect, whatever it is: art, or love, or work or family or life.
Whatever it is you're scared of doing, Do it.
Make your mistakes, next year and forever.” 
― Neil Gaiman
We are just a few hours away from welcoming in the New Year 2016!! (I started writing this post yesterday but obviously as you can see I couldn't finish!!) 
So first things first: Wishing all you wonderful people a Happy new year. May the year 2016 be filled with lots of good cheer and happiness - a new year full of hopes, inspiration, dreams and new beginnings for each one of us. 
As we take our first few steps into a brand new year, let us pledge (especially the 24 hour-on-duty, no time to be sick, no-holidays-ever moms) to take out a little time to live our dreams and grab every opportunity thrown at us, to take a step forward and do things that really mean something to us and make us happy, however small and insignificant those things might be in the eyes of another person.
Let us move forward and live in the moment, knowing that time will never turn back its clock, as each moment wasted can never be found again, it is lost for ever!! 
Let us begin to live a little for ourselves, not to get bogged down by the monotonous day to day chores, always trying so hard to live up to someone else's expectations. From experience you realize that try as hard as you might, you would never be able to make anyone 100% happy. So live your life first, because in the long run if your soul is happy, you can reflect the same happiness to others around you. 
Be positive yourself and before you start looking for the faults in the other person, try hard and remember the good points they might have (Believe me!! everyone has some!) - in the end you might start looking at that same person in a completely different light. 
Well!! This is exactly what is going to be my new year resolution, my mantra for this new year!! 

Last year was quite eventful for me. Leaving a well settled life in India we made this huge decision to move half way across the world, bag and baggage to America and started life literally from scratch here. A year back when we landed in Houston with just two suitcases each, things were so uncertain, it felt as if we would never be able to build back our life together as we had back home. Everything looked so distant at that time but touch wood things have worked out well and everything seems to have fallen into place. 
It has been a good year, full of new learning and experiences. And I loved it that I got to travel and see some great places, which I absolutely love doing. (In fact when I was younger I wanted to be an Air hostess so I could travel extensively and see the world). Apart from missing friends and family back home, the other thing that I haven't been happy about is that, much as I would have liked to, I haven't been able to concentrate on my blog, with so much going on this past year. 
But not worrying about it too much right now, as I am a firm believer in the saying that "Everything happens for a reason and that there is a right time and place for everything!!"
Right now, I feel this is my time to experience this new change in my life, explore new places and create new memories.

With this thought I will leave you all to welcome the new year with this delicious recipe of Butter Chicken. This recipes is a bonanza - kind of buy one get one free type of deal. Along with the butter chicken recipe you get the recipe for tandoori chicken free. So you hit two birds with one stone. Feels good doesn't it. Didn't I say you were off to a great start this year?
You can make the tandoori chicken in an oven or over a barbecue to give the lovely charred smoky flavor. I did mine in the Philips Airfryer - my all time favorite kitchen companion for grilling everything and anything right from meats to your veggies. If you would like to grill the Tandoori Chicken in the Philips Airfryer you can read it here in my other post. It is a great gadget for people who are health conscious but can't resist good food like me. It cuts down your oil content by nearly 70% and that is huge. I personally vouch for it and am a big fan of it. If you want to know more about this wonderful appliance read my review here.
Stay blessed and healthy. Have a wonderful year ahead full of love and happiness and beautiful memories!! 
Cheers to a New year!!

Serves:6-8
Prep time: 20 minutes plus 2 hr marination
Cook time: 30 minutes
Ingredients
For the grilled Chicken
For the marinade
1 cup plain yogurt
2 tsp mustard oil
1 tablespoon lemon juice
1 teaspoon all spice
1/2 teaspoon fresh ground black pepper
1/2 teaspoon ground cayenne pepper
1/2 tsp chilli powder
1 teaspoon smoked paprika
1/2 teaspoon ground cinnamon
1 teaspoon ground cumin
1 tablespoon garlic paste
1 teaspoon salt
2 pounds/ 1 kg boneless chicken cut into cubes (you can also use chicken legs or thighs)
1 tablespoon oil for basting
For the Tomato Sauce
4 pods green cardamom
6  tomatoes finely chopped
2 green chillies
1 tbsp garlic paste
3/4 tsp deghi mirch powder
1 tsp dried fenugreek leaves (kasoori methi)
1 tsp honey
2 tbsp cashew paste
1/2 tsp salt
4 tbsp butter 
4 tbsp cooking cream
Garnishing
a few springs green coriander
2 tbsp cream

Method
In a mixing bowl mix together all the ingredients of the marinade. Keep aside for 10 minutes. Then add the chicken and mix well. Cover and marinate for 2-4 hrs.
Preheat the oven to 430 F.
Skewer the chicken pieces and grill in the oven basting at regular intervals for 8-10 minutes until done. Alternately thread the marinated chicken into skewers and barbecue over hot coals basting with oil till the chicken is tender and done.
Keep aside.
For the gravy
Wash the tomatoes. Boil till soft about 20 min
Grind the tomatoes with green chillies and cardamom to a fine paste and strain,
Heat the butter on low heat in a large frying pan,
Stirring constantly, add in the  garlic paste and cashew paste and saute till brown.
Add the tomato paste and cover and simmer for 10 minutes.
Add in the grilled chicken, salt, deghi mirch, honey, cream and cook on low heat for 20 minutes. You will know when it is done when the irresistible aroma starts enveloping your whole house.
Add the fenugreek leaves.
Remove from fire. 
Served garnished with a swirl of cream on top.

Do try out the recipe and let me know how you liked it. Sweet and sour and tangy, this dish has to be tasted to be believed.

Sunday, 1 February 2015

Tandoori Chicken in the Philips Airfryer

'Tandoori Chicken' - the very name of the dish starts making my mouth water. A huge favorite of everyone in our family, this is one dish all of us insanely miss since we have shifted to the U.S. Back home in India, our staple weekend dinner used to be Tandoori Chicken and Butter Naan from the popular Chawla Chicken in sector 23, Gurgaon, packed and parceled sizzling hot right to our doorstep, an easy convenient option. Chawla chicken has numerous branches all over the city and the reason for ts popularity is that his chicken has always being upto the mark- juicy, perfectly marinated with just the right hit of spices for you to enjoy the dish.

For those of you not familiar with the dish 'Tandoori Chicken' is a popular dish in India which gets its name from the clay ovens 'Tandoor' that they are cooked in. The chicken is marinated in yogurt and India spices for a couple of hours so that the meat soaks in all the flavors. Infact it is quite a visual delight to see the Tandoori chicken being prepared in the tandoor. The meat is threaded on long skewers and then put inside the hot tandoor, which has a high temperature of 800-900F to grill. The high temperatures help to char the meat and give it an amazing flavor and tantalizing your tastebuds with wonderful aromas if you are standing near it watching the chicken being cooked.
A few days back my daughter announced that she had a strong craving for having Tandoori Chicken and if I could try making it at home. I have recently acquired a Philips Airfryer (Avance XL) (I will be sharing more about it in another post soon) and found it to be perfect when it comes to grilling meat.  I love the way it can fry, steam, grill, bake with just a drop of oil. It actually works. I have tried everything in it from french fries to spring rolls to pies,  chicken nuggets, cakes, fish, chicken.... every time with perfect results. The possibilities are limitless but I especially love that every time I grill chicken it is really juicy and moist with all the flavors intact. That is why it is my favorite toy in the kitchen right now and my go-to appliance for most of my everyday cooking.
For all those interested you can also check out my recipes for healthy Gujiyas, Papaya and jaggery cake and Spring Rolls that I have tried out earlier in the Philips Airfryer. After arriving here in U.S I was on the lookout for an XL version as back in India only the Viva Model is available. This has a much bigger capacity of 1.2 kg  and is perfect for our family of 4. If you too are conscious about your and your loved ones health do consider this as an healthy option. Any questions you have about the airfryer, I would be quite happy to answer to the best of my knowledge and experience as a satisfied customer.
This recipe is quite easy and almost as close to the restaurant styled Tandoori Chicken. Do try it and let me know what you thought of it. 
Bon Appetit!!

For the marinade
1 cup plain yogurt
1 tablespoon lemon juice
1 teaspoon all spice
1/2 teaspoon fresh ground black pepper
1/2 teaspoon ground cayenne pepper
1/2 tsp chilli powder
2 teaspoon smoked paprika
1 teaspoon ground cinnamon
2 teaspoon ground cumin
1 tablespoon minced garlic
2 teaspoon salt
6 chicken legs (you can use any pieces of your choice- drumsticks,boneless, breast halves, leg quarters etc)
1 tablespoon oil for basting
Raw onion rings for garnish
1 lemon, cut into slices for garnish
Chaat masala - for sprinkling on top

Method
In a mixing bowl, stir together the yogurt and lemon juice. Add in all the spices, minced garlic and whisk until you have a thick marinade. 
Take the chicken pieces and make a few horizontal cuts on them.
Put in the pieces of chicken in the marinade. Mix till thoroughly coated.
Cover and refrigerate for 6-12 hours or preferably overnight. If making for dinner, usually marinate the chicken the day before for the flavors to really seep in well.
Turn once or twice in the refrigerator.
When you are ready to cook, take the chicken out of the refrigerator.
Preheat the Philips Airfryer to 360F/180 C.
After you hear the ding on your airfryer, which tells you that it is preheated and ready to cook in, arrange the chicken pieces in the basket and cook for 8 minutes.
After 8 minutes pull out the basket, baste the chicken with a little oil and turn it over
Cook for another 8 minutes.
Amp up the temperature to 390F/ 200C and cook for another 4 minutes.
The chicken should look slightly charred. The best way to know when a chicken is done is when you poke it with a skewer you see the juices running clear. Another way is to insert the chicken with a meat thermometer in the thickest portion between the leg aand thigh and the thermometer should read 165F.
Don't worry if you don't have an airfryer alternately you can bake the chicken in a preheated oven at 425 for 30 minutes. Then turn the chicken over, brush it with some oil and cook it for another 15-20 minutes till the juices run clear.
Remove the chicken pieces onto a plate and sprinkle some chaat masala on top, serve it hot garnished with the onion rings and a few squeezes of lemon juice.

Sunday, 13 July 2014

Healthy Spring Rolls - The Airfryer Way!!

There is good news for all of us sweating out there - the Monsoons finally seem to have arrived!! 
I know it must have have brought big smiles and a great sense of relief to all the Delhi people, who have by now had just about enough of the unending sweltering heat the last few days, which obstinately was refusing to simmer down its scorching temperatures. We will think about all the problems that the rains brings along with it later, but for the time being lets revel in the moment and enjoy the cool air and the beautiful change of season.
Come monsoons and your taste buds automatically start craving for hot and spicy fried foods -  a plate of hot pakoras accompanied perfectly with a steaming cup of tea tempts you to throw caution to the winds and makes even the strongest of us forget all resolutions about losing weight. But not with this recipe. You can actually have your cake and eat it too. 
Can you imagine hot, crispy spring rolls without a drop of oil? Don't believe it? It is actually possible with Philips Airfryer which is basically a multi-cooker that lets you cook food without the need for oil. The Airfryer has 'Rapid Air Technology" which uses circulating hot air and a grill element to cook the food evenly without the need of vegetable oil. Now you actually don't have to worry yourself sick about the amount of oil you have consumed when indulging in your guilty pleasures and most importantly without compromising on the taste. It is a win-win situation!!
If you want to know what more you can do in the Philips Airfryer, you can check out my earlier posts - "Healthy oil free Gujiyas" and "Papaya and Jaggery cake".
Atleast I am totally smitten with the Airfryer. I find that it is not just another gadget which will occupy space on your kitchen cabinet and lies forgotten, but it actually delivers what it promises. It is perfect for those of you who are health conscious and and want to keep the use of oil to minimum. You will be surprised how quickly it cooks things with the least amount of effort. Start eating the healthy way with the Airfyer, make it your way of life too and I can assure you that like me, you too will fall in love with it.
So now, you no longer have to say no to your favorite fried food !! Just go ahead and indulge yourself and enjoy  the flavor of these monsoons with your favorite crispy fried snacks without an iota of guilt.
Ingredients:
1 packet of Spring Roll Wrappers - thawed if frozen (Try in a supermarket or even your nearest department store- you will be surprised how easily available they are now)
1/2 cabbage - sliced in thin strips
1 small carrot julienned
1 onion, finely sliced
1 tsp finely chopped ginger
1 spring onions, finely sliced lengthways
200 gms boneless chicken breast, sliced into thin strips
1 tbsp oyster sauce
1 tbsp light soy sauce
2 tbsp cornflour
salt and pepper to taste
Method
Heat 1 tbsp oil in a pan till smoking. Add the cabbage, carrots, onions, spring onions, and ginger. Saute the vegetables quickly on very high heat for 1-2 minutes. Add the salt, pepper, oyster sauce and soy sauce. Be careful not to overcook. The vegetables must still have a crunch. Remove from heat and keep aside to cool down.
In the same add the chicken and stir fry for 3-4 minutes. Season. Stir in with the vegetables till well mixed and keep aside to cool.
Make a thick paste of cornflour with 1 tbsp water.
These are the spring roll sheets I got and that too most surprisingly from my local supermarket. There were over 20 sheets in one packet. You need to thaw them to room temperature before separating the sheets. The great thing about this spring roll wrapper is that what you don't use you can throw them back in the freezer to reuse.
Peel your spring roll wrapper off and lay down one sheet on the surface like a diamond as shown..Cover the unused wrappers under a damp cloth as they dry off very quickly. 
Divide the filling into equal portions. Place some filling on one corner of the wrapper.
Roll tightly and when you are about halfway stop and fold in the opposite corners towards the middle so it looks like an envelope. Brush each corner with the cornflour paste.
Roll the pastry tightly towards the top corner.
Repeat with the remaining spring roll wrappers and fillings.
Place them seam side down (helps secure the corner so that the corners don't open). keep the rolls covered under a damp cloth.
Heat the Airfryer for 10 minutes @ 200. Brush the rolls with oil and place in the Airfryer basket.Cook for 5-8 minutes or till golden and crispy. You will be seriously impressed how crispy these spring rolls turn out to be and that too without oil.
Cut into smaller pieces and serve hot.
Some important Tips (from the net)
  • The best way to defrost a spring roll wrappers : overnight in the refrigerator or keep out on the counter for 30 minutes.
  • once the wrapper are defrosted,, open the package and immediately cover with a barely damp towel. The wrappers will quickly dry out and get cracked if left out in the open uncovered.
  • if the wrappers  dry out and are stiff, you can put a few wrappers on the plate, cover with a damp towel and microwave on medium for 10 minutes. The wrappers will soften up.

Friday, 21 March 2014

Papaya and Jaggery Cake// Baking in the Philips Airfryer

                     
Ever heard of a papaya cake? I agree that it is an unusual combination but if you can have an apple cake, a banana cake,  pumpkin cake,  pineapple cake, then why not a cake made with papayas? Isn't the papaya fruit supposed to be packed with nutrition and has numerous health benefits?
I too decided to go ahead and try out a papaya cake. Truthfully, It was only because I had a big bowl of over-ripe papaya lying around which no one wanted to touch. I did not feel like throwing away the over-ripe fruit, so I decided to puree it and keep it to use for one of my beauty treatments. Seriously, papaya apart from being nutritious and having excellent health benefits, is also great to use as a hair mask and a wonderful  toner for your skin. If you don't believe me, try it out yourself and watch how your skin glows and hair shines.
To pamper yourself with any kind of beauty treatments, you also need to have some solid 'me' time and with the kids hanging around the house nowadays, that is almost impossible to achieve thanks to their incessant demands. I actually don't mind. They are not all that bad, sweet devils that they are, I too feel good making them feel special, knowing they will be back to gruelling school hours in a couple more days.
So, I decided to experiment with the neglected papaya puree and decided to use it in my cake. Baking cakes with fruit purees is a wonderful way to substitute fat in your cake. Did you know you can replace about half the amount of fat called for with fruit puree. So, if a recipe calls for 1 cup butter, you can very easily substitute with 1/2 cup of fruit puree of any kind. You can see my recipe for Mango cake here made with mango puree. So, next time you bake a cake, try out this healthier option.
Another idea that I have been toying for a long time is to bake a cake with Jaggery. On a recent visit to Nangal (Punjab), we had this wonderful opportunity to see fresh jaggery being made. The kids were thrilled to see the whole process where sugarcanes were picked straight from the fields, fresh juice extracted with motorized crushers right there on the field, then collected in big vessels and  boiled and then allowed to set (which hardly takes a few minutes) right there in front of their eyes. It was a huge learning process for all of us and believe me there is nothing more delicious than having freshly made gud -my twosome also agreed even though they have on all other occasion refused to even put it in their mouths. So, I am happy we all got back something from the experience - kids witnessed how jaggery was made and I came back with tons of fresh gud (some for myself and rest for gifting).
The cake though an experiment, surprising was delicious. Even though it had an extremely moist texture, the cake held its shape and tasted fantastic, with the jaggery lending it a very earthy taste. Infact the flavors reminded me quite of the Sticky DateToffee Cake I had tried some while ago which again was delicious. The kiddos too enjoyed the cake and couldn't guess what the ingredients of the cake were. Only when it was disclosed to them that the cake had jaggery, did they twist up their little noses. Inspite of that,  it was finished within no time.
So next time you too have some over-ripe papaya lying around your house which no one wants to eat, you know what exactly to do with it, don't you?
Ingredients
3 eggs
3 Tbsp granulated sugar
150 gms Maida
1 tsp baking soda
1 tsp baking powder
100 gms jaggery soaked in 1/2 cup water
1/2 tsp cinnamom powder
3 tsp lemon juice
1 cup papaya puree
1/4 cup canola oil

Method
Preheat the oven to 180 C.
Beat the eggs with the sugar for 5-6 minutes till nice and fluffy. 
Sieve the flour with the cinnamon powder, baking powder and baking soda.
Mix the flour, oil, lemon juice, papaya puree and jaggery water with the egg and whisk gently till all the ingredients are mixed well.
Pour the mixture in a greased pan and bake in a preheated oven for 40-45 minutes or till a skewer inserted comes out clean.
Let it cool for sometime before serving.

I even made muffins from the same batter in the Airfryer that I have been sent to review. Just 8 minutes baking time and they were done to perfection. I only wish the size of the basket was a bit bigger. But still they tasted awesome.